Turning the tables 1
- Kylee McDonagh
- Nov 11, 2022
- 6 min read
Getting what you want from MS Word's table formatting is actually more possible than it may seem—once you know where things are hidden. This blog is a short How-To guide (for Word for Mac 365), and I'm only going to outline a few useful things (so as not to be too overwhelming all at once). Many of the issues I highlight in this short primer will illuminate menus that you may be glad to discover, particularly the Layout menu. It's a clever squirrel, the Layout menu. Does a lot of cute things, but there's a trick to catching it.
You think I'm kidding, I know you do. Ha! Read on!
When I get tables from my clients, they usually look something like Figure 1:

It's not catastrophic, but it does have a few issues. I've highlighted some of them in Figure 2 (below). Note that the Layout menu tab is notated in red. You need this tab, so go find it on your own Word screen.

Did you find the Layout menu tab?
TIP: You need to click inside a table before this menu will appear.
AHA, you see! I made you look for the tab first, and it's not there, is it? Word is wicked that way. The ignorant suffer. But don't worry; you know now, so you can kick ass. Click inside the table to format the table using the Layout menu.
Let's look at the four issues highlighted in Figure 2 in turn.
Pink is an indent problem, which can be fixed in the Format, Paragraph menu: There is a left indent applied to the whole column. But wait—
The green loops show that the whole table (all the cells) also has a "First line indent" applied to the text. This can also be fixed in the Format, Paragraph menu. But wait—
Both of these issues can be solved by selecting the whole table and using the "remove formatting" button on the Home menu ribbon (see dark blue circling in Figure 3, below):

TIP: You can select the table in three different ways. It may seem like this is basic stuff, but you will find your groove with these kinds of things once you know them all, and some are particularly useful for certain jobs.
You can drag the cursor over it to select it, like text (the basic job).
You can click on the little "cross" at the top left of the table (you can see this in Figure 3).
You can use the Select button/menu on the Layout menu tab. (You can't see this in Figure 3 because the image shows the Home menu. However, if you look at Figure 2 again, you can just see the Select button/menu is at the top left of the image and looks like an arrow.) This menu drops down so you can select table, column, or row. This menu-based selection method is super useful for grabbing the cells you want without missing any with a hasty cursor drag.
Where did all the indents and spacing come from in the first place?
When you make tables, Word will automatically use the default "Normal" text style for anything you type inside the table. This default style is not helpful, as it often has both extra spacing and indents applied to it that are more applicable for regular lines of text.
It's always better to remove formatting on table text and begin with a clean formatting slate.
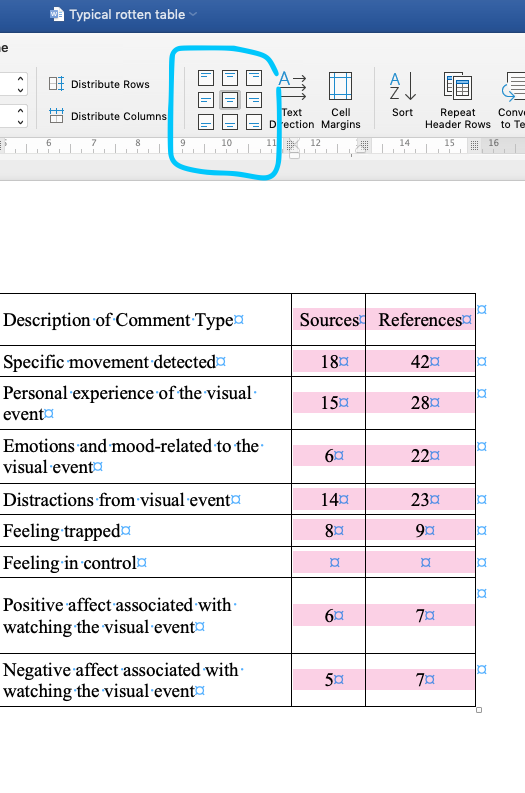
So, all the green and pink problems are now solved. To continue with the issues in Figure 2, the light blue/aqua highlights an item that I hope is clear enough in Figure 4: The cell alignment is set to top left. (The cells I've selected in Figure 2 to demonstrate this top left alignment might be a bit puzzling in terms of top left because those 7s are not on the left—That's because of the indent problem. We fixed that just now, so imagine it fixed... the 7s are top left...)
In terms of choosing alignment for your table cells, it often looks better if the alignment of written text type columns (such as the "Theme" column in the current table) is set to middle left. This will centre the text in the vertical middle of the cell so that the lines look vertically similar as they are read (like ordinary text) from the left. In contrast, columns with numbers in them usually look best if their alignment is set to middle centre, which centres the text vertically and horizontally in the cell. This middle centre choice is (happily) the middle box in the 9-box alignment array that is highlighted by my blue ring in Figure 4:

The highlighted text in the table has been formatted according to the middle centre option, as you can probably tell.
The final issue to solve is the dark blue—these lines in Figure 2 are supposed to approximate some of the table's gridlines. You can see in Figure 1 that the table has all its gridlines visible. If you print this, the table text will look like it's in a grid. A complete gridline look of this sort is the default table-building style, and as such it is also a sure sign of a table amateur—but you aren't one anymore, so don't worry. Upgrades are on the way!
To remove the gridlines, you need the Layout tab again.
TIP: Just a notation that there is no point clicking the button marked "View Gridlines" to turn off the gridlines. This apparently self-explanatory, simple solution is a red herring. All this button does is show you (on your screen) the gridlines of all the table cells, whether or not they are black (in use) or invisible (not in use). When gridlines are deselected, and you have no visible gridlines, the cells have no borders, but the table is still readable and looks a bit more professional. As we are about to do this and make all the gridlines invisible, remember to come back and click the "View Gridlines" button a few times to see what it actually can do for you.
Until then, to genuinely remove the gridlines, you'll need to find the button in the Layout tab that is (un)helpfully marked "Table Properties" (quite indicative of what you need, I know—aka, more MS Word wickedness). When you click this button, a menu will pop up. Look on this menu for the button marked "Borders and Shading". Figure 5 gives a basic visual of these steps:

When you open the "Borders and Shading" menu, you will see that there are various ways you can decide on your borders. Word really is amazing at providing the maximum number of variations (even though these can be as confusing as heck). Figure 6 shows you the menu:

Once you have succeeded in removing the gridlines, you will be able to add specific lines to certain rows. We can't leave the whole table without any edges or definition for the heading rows, as this won't look too good.
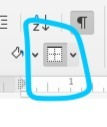
The "border" button on the Home menu allows you to select the borders you want. For academic tables, I recommend lines are added horizontally to highlight heading bars, as well as to the bottom row, to "close" the table area. Figure 7 shows you the border button and Figure 8 (immediately following) shows you the steps to add a border to a row. (Remember that you can use the Layout, Select>Row to highlight the row you want, but you need to return to the Home menu to find the border button.)


This method of controlling table borders works well and is fairly intuitive once you get the hang of where everything is.
TIP: I have also changed the typeface of the table text to a sans serif. It is important to use a sans serif font for both table and figure text. This helps to separate it from the main narrative text. While separation may seems clear enough in a table, when a figure has various text attached around an image (like a model of your literature review, for example), it can be easy for a reader to start reading the figure as thought it's the text (which is suboptimal). A sans serif font also makes these items look clean and easy to read. I recommend Arial or Helvetica/Helvetica Neue (but only choose one of these and use it throughout). Your main narrative text should be in Times New Roman.
So, now you know how to reveal the Layout menu, remove formatting all at once, change the text alignment in table cells, and remove the gridlines via Table Properties (you'll be amazed what else is hiding behind the various tabs in the Table Properties menu!).
This concludes the first instalment of Turning the Tables on Word table formatting. I hope you have discovered something useful!
Have a beautiful day!


Comments